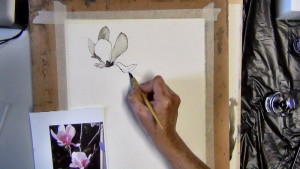
Recently I did this demonstration of a pen and ink drawing of Magnolias. Technically this is as much a painting as it is a drawing but for now I will continue to call it a drawing. The demonstration was videoed and a speeded up version of it has been posted on YouTube. A link to the video appears below. I have produced this article to help you understand the basic steps I used in this pen and ink drawing.
Reference photo for Magnolias pen and ink drawing
This photo is of some blooms on our Magnolia tree – a favourite of my wife. Please use it as a reference if you’d like to have a go at this pen and ink drawing demonstration yourself.

The photo has strong tonal changes (light going to dark and vice versa) which always attracts me in a scene.
Materials Used
Permanent Black Ink – Art Spectrum brand but any permanent ink should work as well.
Dip Pen and holder – the nib I use is a Hunt 99 model (the nib and holder only costs a few dollars)
Arches 300 gsm, cold pressed, watercolour paper. Dimensions are: 37cm x 27cm or 14.5” x 10.5”
Filled water container.
Backing board and tape.
Starting Pen and Ink Drawing
I tackle a drawing like this by first having a clear idea in my mind where I am going to place an object before I touch the paper. This is very important with pen and ink drawings as once you place a mark it is very hard to remove it.
Next I decide quite early roughly how big I want the finished drawing to be. In this case I am working from a photograph that is a quarter the size of my paper which means that the photo is approximate half the length or width of my watercolour paper. Consequently if I want to cover my whole paper with my pen and ink drawing then I need to approximately double all the dimensions of my image. I do this mentally as I do not care if the result is exact or not.
So my first line is near the top left hand corner of my watercolour sheet. I start by outlining a single petal making sure to stop where the line intersects with another petal – this is very important.

Before this first outlined petal dries I use a wet brush to soften its edges and let some of the ink bleed over the petal shape to give it form.

I continue in this fashion till the first flower is nearly complete. I move from petal to petal making sure that adjoining petals are dry so the ink does not flow into one another unless I want it to.

With the first flower nearly completed I added the stem at its bottom which connects it to the next magnolia flower. I stop the stem where it will intersect with the next flower.

Continuing my pen and ink drawing, I make my way down and over my paper, making adjustments to tones as needed. I felt the arrangement needed another flower bud on the right hand side for balance so I added it.

Adjustments are made as needed till my pen and ink drawing was completed.

Here is a photo of my finished pen and ink drawing:

If you would like to see a 5 minute speeded up version of my doing the above pen and ink drawing please have a look below.
